Final Image Preview
Step 1
Open PSD file that was created on Part 1 of this tutorial. Select layers Nebula and Galaxy and merge both layers by going to Layers > Merge Layers (Ctrl+E). We will have now three layers: black, white, and the one with the galaxy. It’s worth noticing that space is very beautiful, all colors can be found in it, so let’s add them into our galaxy. Create a new layer and change the layer Blending Mode to Color. After that select a soft-edged Brush Tool, opacity 10%, 300 pixels in diameter, color #5a78cc and paint it arbitrarily.
Step 2
Keep Brush Tool selected and change color to #ff0000 to add red color.Step 3
Keep Brush Tool selected and change color to #fff000 to add yellow color.Step 4
Create a new layer. On this new layer we create the centre of the galaxy. Select a soft-edged brush, 500 pixels in diameter, color #ffffb7, opacity 100%.
Step 5
Change the brush diameter to 300, white color (#ffffff) and apply.Step 6
Shape the shining to the galaxy outline with the help of Edit > Transform > Scale:Step 7
Rotate using Edit > Transform > Rotate:Step 8
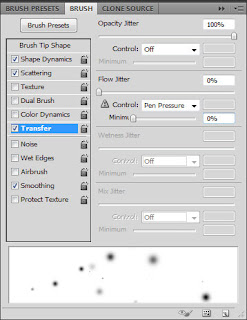
Any galaxy needs stars and our galaxy is not an exception. To bring bright stars to the canvas, create a new layer, select a soft-edged Brush Tool, opacity 100%, white color (#ffffff) and open Brush Panel to adjust settings (Windows > Brush or press F5).
Select Shape Dynamics option and change settings.
Select Scattering option and change settings.And on Transfer option update opacity to 100% and change Control to Pen Pressure.
Important: On older Photoshop versions there isn´t any Transfer option but Other Dynamics option is available and this is where you update settings.
With the help of this brush, change its diameter according to the situation and your taste and we can create stars along the outline of the galaxy and slightly beyond its bounds.
Step 9
It´s worth remembering, that the closer the stars the bigger they appear to be on the picture. So you need to keep changing brush size.Step 10
There is also its own nebula around the stars. Duplicate the layer (Crtl+J) and blur the layer that is below using Filter > Blur > Gaussian Blur:Step 11
Stars have color too. Select the Gradient Tool and set up following presets:Go back to original stars layer and select stars. Create new layer and apply gradient.
Move this layer below both layers that contain stars.


0 comments:
Post a Comment